SkyShed Pier Installation
- TJ Connolly
- May 12, 2020
- 2 min read

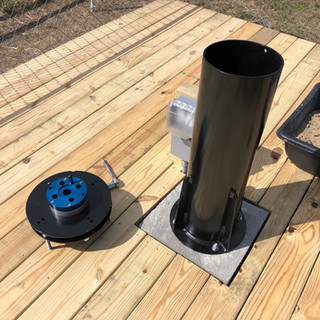
I finished the SkyShed pier install and mounted the Celestron 9.25” EdgeHD. I secured the steel pier directly to the concrete and used stainless steel washers to bolt the pier to the j-bolts. I then filled the pier with playground sand. It took two 50 pound bags of sand to fill it to the top. I opened the bags and poured the sand in a black tub to dry the sand out. The SkyShed Pier is a perfect design as the top plate on the pier unbolts and gives access to the entire tube. I put a piece of duct tape at the bottom of the tube to cover a hole so the sand wouldn’t come out. The pier is solid and feels more sturdy than the heavy duty Celestron CGEM DX tripod I was using before. Prior to putting sand in the pier, I gave it a hard knock, and could hear and feel the ringing in the tube. After adding the sand and giving the pier a hard knock, the ringing was nicely dampened and it was a solid knock.
You may notice I am using two pier adapter plates. This is because with one adapter plate, the altitude knob on the CGEM DX mount runs the top plate and won’t sit flush to the plate. Another option I could have done was to use a standard hex bolt, but I wanted to be able to use the stock knob and the knob looks nicer than a bolt sticking out.
The scope is perfectly balanced and communicating wirelessly without any issues with the ZWO ASIair from inside the house using the TP Link travel router. Since I am still waiting for the POD to be delivered, when I am not imaging, I remove the optics off the mount and cover the mount and pier with a Telegizmos 365 cover. Now time for some deep space imaging!


Comments